In the
previous post we introduced the idea of PeopleSoft's new Related Content functionality. In each of the next few blogs entries we will explore how to set up each type of Related Content.
The first related content we will create is simply pulling in an existing PS Component into the related content section of the page.
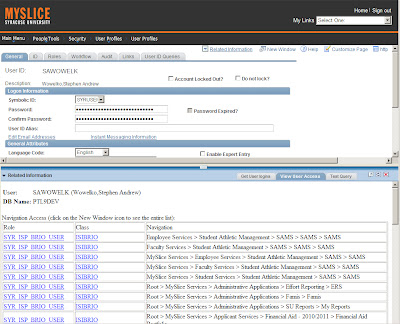
In this example I will show the User Profile from our HRMS (Campus Solutions) product as related content in the User Profile of the Enterprise Portal:
The content in the top of the screen is the user profile in the Enterprise Portal, and the lower portion is the User Profile from HRMS.
Setting up this related content was very quick and easy. Here are the steps I used:
Set up the Related Content Service
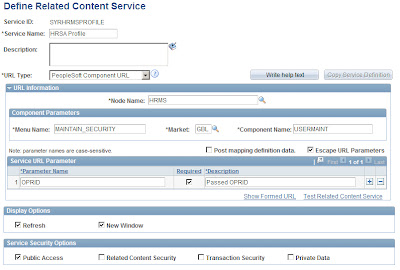
Navigate to PeopleTools > Portal > Related Content Service > Define Related Content Service
This page allows you to set up related content that can then be attached to one or more pages or components.
Add a new Related Content Service. We name ours with a pre-pended SYR to ensure we know which ones were created by Syracuse University vs any that might be delivered by PeopleSoft at a later date. The Service Name should be descriptive enough to let people know what the service does when they perform the next step.

| Service Name | This is the name of the related content and will appear on the parent page as the related content drop down parameter and the related content tab name |
| URL Type | Select PeopleSoft Component URL. This field determines what type of Related Content you will be creating. We will be exploring each of the values here. |
| Node Name | Enter the node where the target component exists. In most cases this will be the local node, but in my example I am pulling information from our Campus Solutions product so the node is the one that points to that system (HRMS). |
| Component Parameters | This section changes depending on what URL type was selected. In the case of PS Component related content the Menu/Market/Component name must be entered |
| Service URL Parameter | This section designates what information will be passed to the related content. Since I am tying the related content to the User Profile page I need to put the OPRID field in here as that is the key on the HRMS User Profile component. |
We will discuss the Display Options and other generic parameters later. For now, save this service.
Attaching the new Service to a Component
Now that we have a service defined we need to attach it to the component.
Navigate to PeopleTools > Portal > Related Content Service > Manage Related Content Service
If you have any existing components/pages that have related content attached those will appear here. If the component you wish to attach the new service to appears in the list select "Edit Configuration" otherwise select "Assign Related Content to Application Pages".
Once in this page you can decide to attach the related content to the Component or the Page. If you select Component the Related content will be available to all pages in the component.
For the Service ID, select the new Service you created. If you select the Default Service box the tab for this service will always be the default one opened. You can only have one Default Service.
The Sequence number is simple the tab order of Related Content as it will appear in the Related Content pane.
If you try to save now you will receive the message "Security option is not defined for the Service 'HRSA Profile'. Click the 'Map Fields' link to define a security option."
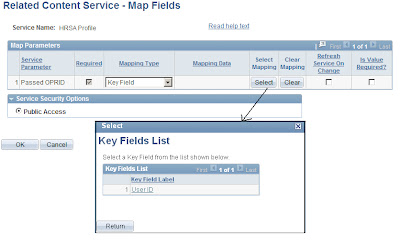
Click on the Map Fields link and select the Security Option
This is also where we map the data from the parent that should be sent to the child. In our case we want to send the OPRID from the Enterprise Portal to the HRMS Component so that the inoformation in the Related Content is, well, related to the parent. You can define field mapping as
| Fixed Value | This allows you to hard-code values to be passed to the related content |
| Key Field | This allows you to define keys from the parent as data to pass to the child. |
| System Variable | This allows you to use system variables as data to be passed (ie %EmployeeID, %Date, etc) |
We want to pass the Key value (OPRID) from the Portal to HRSA, so I selected Key Field.
You may then click on the Select push button to attach the key value.
Click on OK, then Save.
Test the new Service
That's it. You are done!
Navigate to the parent component and you should now see the related content!
In the
next blog entry we will explore creating related content that brings in information from non-peoplesoft pages


